How to add Google Maps in an Android app in 34592 simple steps
![]()
Adding Google Maps in your Android app is a really tricky business. Android itself has a decentralized structure, meaning that you need to add several settings here and there. Choosing an IDE is also an issue for Android and nowadays Android Studio is the main tool for the job. Then, every piece of that equation changes fast, Android itself, Android Studio, Android SDK's libraries and Google Maps.
The example in is article will show you how to add Google Maps in an Android app using Android Studio 0.4.6 with Google Maps v2.0.
Step 1 - Create a new Android project
We will start by creating a brand new Android project. It is always good to test on a brand new project because this way you isolate settings or other variables from existing projects that may interfere in an unpredictable way.
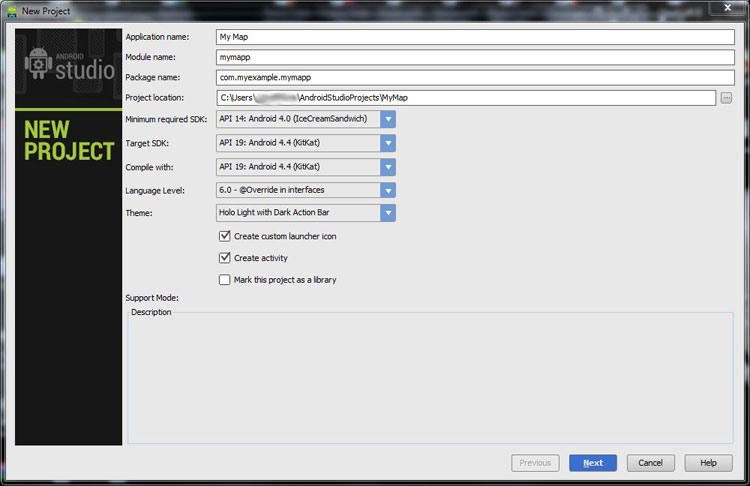
Notice that in our example we use Android 4.0 as minimum required SDK. Google Maps v2.0 have different object handlers for the newer Android versions and in older ones.
Complete the wizard steps with the default settings.
Step 2 - Install the Google Play library
One of the first things we need to make sure is that you have the Google Play services installed. So click on the "SDK Manager" button.
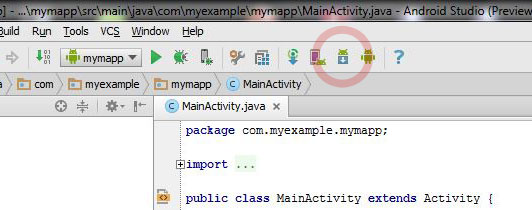
In case you are using MS Windows and that button doesn't do anything, you need to close Android Studio, then right-click on Android Studio's icon and choose "Run as administrator". Running Android Studio as administrator will give you access to protected files. Then click the SDK Manager button again, now it should work fine.
Go to the section "Extras", locate and install "Google Play services".
In the course of this tutorial the system may ask you for more dependencies from the SDK, so browse what else is there and expect to use the SDK Manager again.

Step 3 - Android manifest
Google provides useful examples; you can find them in its SDK files. But, their examples are not completely up to date and they are not in accordance to the Android Studio's requirements. Let's see what they offer and what portion is useful for this example.
Google's SDK examples in MS Windows are at C:\Program Files (x86)\Android\android-studio\sdk\extras\google\google_play_services\samples\maps and in Apple Mac OS X are at /Applications/Android Studio.app/sdk/extras/google/google_play_services/samples/maps .
From Google's examples open the file AndroidManifest.xml.
The opening tag contains android:versionCode="6" android:versionName="2.7.0" which we will ignore. Android Studio uses Gradle as package manager and that manager handles the version information.
The next few lines are prepared in a way to be copied straight to your project's manifest. Those lines start with a line of comment reading "<!-- Copied from Google Maps Library/AndroidManifest.xml. -->" and end with the line <!-- End of copy. -->. All these lines are useful except from the starting tag that reads "<uses-sdk android:minSdkVersion="9" android:targetSdkVersion="17"/>". The reason is again Gradle. Gradle wants the full control of versioning, so you can copy all this section except from this tag.
The next tag you can see in the example is <application>. An attribute included in that tag android:hardwareAccelerated="true" is useful because it is required for OpenGL mentioned in the part we copied previously.
After the <application> tag you can see two <meta-data> tags. Those are useful, so we copy them to our example. The one mentioning an API key, obviously contains an API key which we will replace a few steps later.
This is what we have so far in our example's AndroidManifest.xml
<?xml version="1.0" encoding="utf-8"?>
<manifest xmlns:android="http://schemas.android.com/apk/res/android"
    package="com.myexample.mymapp" >

    <!-- Copied from Google Maps Library/AndroidManifest.xml. -->
    <uses-permission android:name="android.permission.ACCESS_NETWORK_STATE"/>
    <uses-permission android:name="android.permission.INTERNET"/>
    <uses-permission android:name="com.google.android.providers.gsf.permission.READ_GSERVICES"/>
    <!-- External storage for caching. -->
    <uses-permission android:name="android.permission.WRITE_EXTERNAL_STORAGE"/>
    <!-- My Location -->
    <uses-permission android:name="android.permission.ACCESS_COARSE_LOCATION"/>
    <uses-permission android:name="android.permission.ACCESS_FINE_LOCATION"/>
    <!-- Maps API needs OpenGL ES 2.0. -->
    <uses-feature
        android:glEsVersion="0x00020000"
        android:required="true"/>
    <!-- End of copy. -->

    <application
        android:allowBackup="true"
        android:icon="@drawable/ic_launcher"
        android:label="@string/app_name"
        android:theme="@style/AppTheme"
        android:hardwareAccelerated="true" >

        <meta-data android:name="com.google.android.maps.v2.API_KEY"
            android:value="AIzaSyCvGBr5in13NK2yYBR7lhXTtnxj3mrXQy4"/>
        <meta-data
            android:name="com.google.android.gms.version"
            android:value="@integer/google_play_services_version" />

        <activity
            android:name="com.myexample.mymapp.MainActivity"
            android:label="@string/app_name" >
            <intent-filter>
                <action android:name="android.intent.action.MAIN" />

                <category android:name="android.intent.category.LAUNCHER" />
            </intent-filter>
        </activity>
    </application>

</manifest>
The IDE will show you the variable @integer/google_play_services_version in a red color. That means that it cannot find a reference to that variable. It will be fixed with the next step.
Step 4 - Set up Gradle
Now it is time to update our Gradle settings. Gradle organizes packages and compilation. Google Maps require the Google Play library we installed in the previous steps. Now we need to tell Gradle how to link to that library.
So let's open the "build.gradle" file. You may get a little confused because there are two files with that name. The one we are interested in is the one that contains "apply plugin: 'android'". Make sure you open the right one and locate the area that contains the dependencies section. In that section add compile 'com.google.android.gms:play-services:4.2.42'. Once you do that, the IDE will show a yellow toolbar with the option "Sync Now". You need to click that option so that Gradle get synchronized with the new dependency.
For once more, we need to point out that Android's components, including Gradle, change fast. You may get errors due to new syntax or other changes from the Gradle platform. In case you experience errors not documented in this article you need to study the new regulations and adjust accordingly.
Our Gradle settings so far look like this:
apply plugin: 'android'

android {
    compileSdkVersion 19
    buildToolsVersion "19.0.2"

    defaultConfig {
        minSdkVersion 14
        targetSdkVersion 19
        versionCode 1
        versionName "1.0"
    }
    buildTypes {
        release {
            runProguard false
            proguardFiles getDefaultProguardFile('proguard-android.txt'), 'proguard-rules.txt'
        }
    }
}

dependencies {
    compile fileTree(dir: 'libs', include: ['*.jar'])
    compile 'com.google.android.gms:play-services:4.2.42'
}
Now our project has the proper links to the Google Play library.
Step 5 - Activity layout
We have the libraries in place, we have the manifest up to date, now let's set up the activity layout.
Here is a tricky part that may confuse you. Google's examples use com.google.android.gms.maps.SupportMapFragment as the fragment for the map. There are two versions of fragments, SupportMapFragment and MapFragment. The first version is for old versions of Google Maps, the second one for newer ones. So Google's examples wouldn't work in our example because we develop for Android v4.0 or newer. They will work if we change SupportMapFragment to MapFragment.
So if we use Google's example fragments, with the small modification, we get something like this:
<RelativeLayout xmlns:android="http://schemas.android.com/apk/res/android"
    xmlns:tools="http://schemas.android.com/tools"
    android:layout_width="match_parent"
    android:layout_height="match_parent"
    android:paddingLeft="@dimen/activity_horizontal_margin"
    android:paddingRight="@dimen/activity_horizontal_margin"
    android:paddingTop="@dimen/activity_vertical_margin"
    android:paddingBottom="@dimen/activity_vertical_margin"
    tools:context="com.myexample.mymapp.MainActivity">

    <fragment xmlns:android="http://schemas.android.com/apk/res/android"
        android:id="@+id/map"
        android:layout_width="match_parent"
        android:layout_height="match_parent"
        class="com.google.android.gms.maps.MapFragment"/>

</RelativeLayout>
One of Android's strong advantages is layouts. This is just one of the many layout variations you can do, according to what you want to accomplish. You can modify the layout code to fit only the MapFragment without RelativeLayout, or in another way to fit more controls.
Step 6 - Collect the requirements for the API key
The last thing we need is the API key. If you are doing this for the fist time it will be a little hard; from then on, getting an API key is a matter of a few minutes.
Before we open Google's consoles, we need to have the SHA1 signature from your "key store".
If you don't know what a key-store is, you eventually need to learn everything about it because that is the only way you can sign and publish your app. If you are coming from iOS, the key-store files are what provision certificates are in Apple's ecosystem. There is a default key-store with a default alias that signs your apps for debugging purposes. The path to the key-store file and the alias are important because we will need them to get the SHA1 signature. In this example we will use the default key-store and alias, but when the time comes to publish your app you will need to repeat the same steps with the official key-store and alias. In MS Windows the key-store file usually is in
C:\Users\<user name>\.android\debug.keystore, and in unix systems it usually is in ~/.android/debug.keystore
Open a terminal/console, or use the built-in terminal in Android Studio to get to the key-store directory. You obviously need some basic skills of Unix shell or MS DOS to do that. Once you are in the key-store directory type
keytool -exportcert -alias androiddebugkey -keystore debug.keystore -list -v . The system will ask you for the key-store password, enter android .
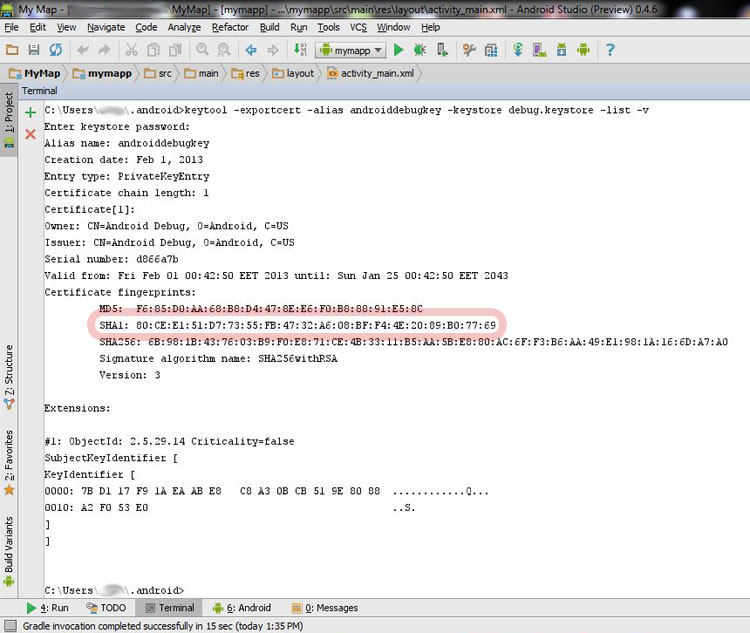
From the output locate the contents for SHA1. In our example that would be 80:CE:E1:51:D7:73:55:FB:47:32:A6:08:BF:F4:4E:20:89:B0:77:69 .
That is the SHA1 signature for the alias "androiddebugkey" in the keystore "~/.android/debug.keystore". Now we need to put it together with the package name of our app. If you go up to the manifest you will see that our full package name is "com.myexample.mymapp" . We must join those two with a semicolon as a delimiter. The full signature of this app will be 80:CE:E1:51:D7:73:55:FB:47:32:A6:08:BF:F4:4E:20:89:B0:77:69;com.myexample.mymapp , and that is what Google will ask in order to give us the API key.
Step 7 - Request the API key from Google
In this step we assume that you have a google account. If not, go ahead and create one.
For this step you will need to visit https://code.google.com/apis/console/ .
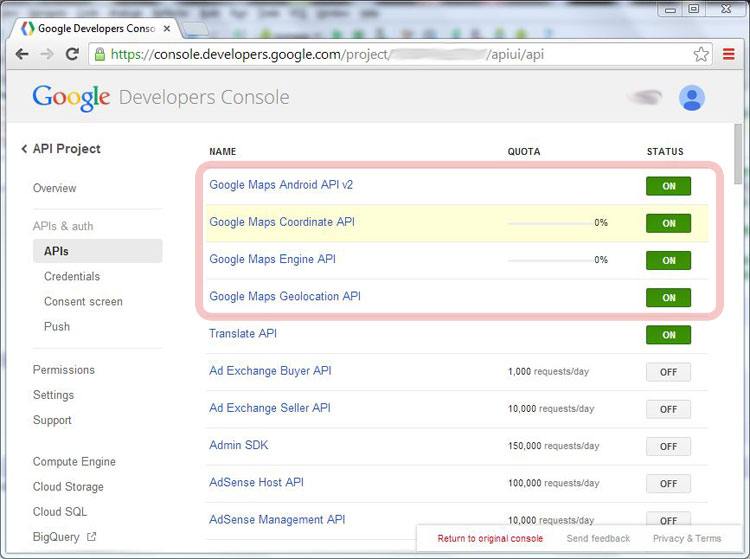
Open the "APIs & auth" section, and then go to "APIs" . You will see a list of available APIs by Google. You need to enable the APIs required for maps. Simple usage of those APIs will not raise costs, so feel free to enable all those related to maps.
From the side-bar go to the "Credentials" section. Find the area for "Public API access" and click the "Create new key" button. From the dialog select "Android key" . Enter the signature we prepared in the previous step and click the "Create" button. That's it, you are now taken back to the list of Public API access points. A new section is just created for the information we just entered and the API key is now available.
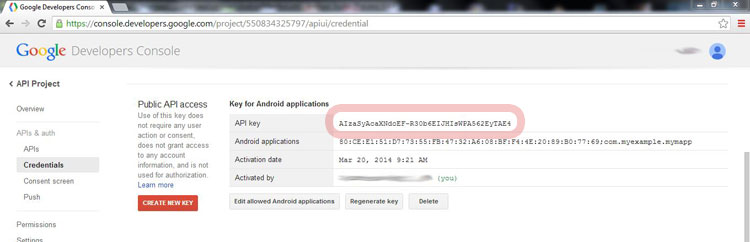
Copy and paste the API key back in the AndroidManifest.xml file we discussed in step 2.
Step 8 - Run your app
Run your app.
The steps we did to this point where the ones that make your app functional for the first time. From this point forward you can make improvements in code or layout.
In case you are testing the app in a real device (not a simulator), make sure you have the internet access (WiFi or mobile data enabled).
Helpful information
Google's SDK samples contain very useful examples of what you can do with Google Maps.
An ugly truth about Google Maps for Android is that you don't get a lot of help from error messages. Usually if you make a mistake at any point from the steps previously mentioned, the map will simply won't work. That is why we recommend to add some software checks, one that ensures internet access is available, and another one that ensures Google Play software is installed in the user's mobile device.
You can use NetworkInfo along with ConnectivityManager to check the availability of internet access.
You can use GooglePlayServicesUtil.isGooglePlayServicesAvailable() to see the status of the Google Play software installation in the user's mobile device.
Also, one very useful resource is http://developer.android.com/google/play-services/setup.html
Step 9-34592
You may need a few more steps to make this whole thing work if the Android SDK changes, or if Google Maps' software changes, or if Gradle changes, or if Android Studio changes, or if Jeus overthrows Jesus Christ from the heavens, or if grumpy cat makes another meme wish, or if right wingers discover and then loose human intelligence, or if Flappy Bird gets published again.